

Ready to dip your toe in the murky waters of NFT investment? This guide is intended to show even a total noob like you how to do it. As I write this in March of 2022, the user experience for everything below ranges from mediocre to poor. But future developments will undoubtedly obviate the need for the processes I describe or at least make them almost frictionless.
Case in point: Coinbase, the popular cryptocurrency exchange, is rolling out an NFT exchange “soon”. It originally was slated for Q4 in 2021, but whatever. If you already use Coinbase, waiting to do all of the below on a platform you already use might make more sense.
Also, there are many ways to do what I describe in this article - I’m just describing the path I know.
And: just because someone teaches you how to swim doesn’t mean you’re not gonna get eaten by a shark, drown in a vicious undertow, and/or be stung by an Australian box jellyfish: there are plenty of ways you can screw this up and lose your entire investment. I’ll cover a few of those, too.
On that cheery note, let’s dive in!

Step 1: Buy ETH
Coinbase is the most popular US cryptocurrency exchange, and it’s an on- and off-ramp if you want to trade dollars for crypto, or vice versa. I’m not going to go into any tax implications in this guide since I’m not an expert, and it would take too long. But let’s say you have some spare dollars lying around and you want to buy some ETH with them.
Create a Coinbase account. You will have to use your real name, and Coinbase will verify your identity by making you upload your driver’s license. Coinbase has stepped up its KYC (Know Your Customer) rules over the years, and now asks for your phone, employer, source of funds, and the last four digits of your social security number.
Connect your bank account or other financial account (see below for all US account funding methods):
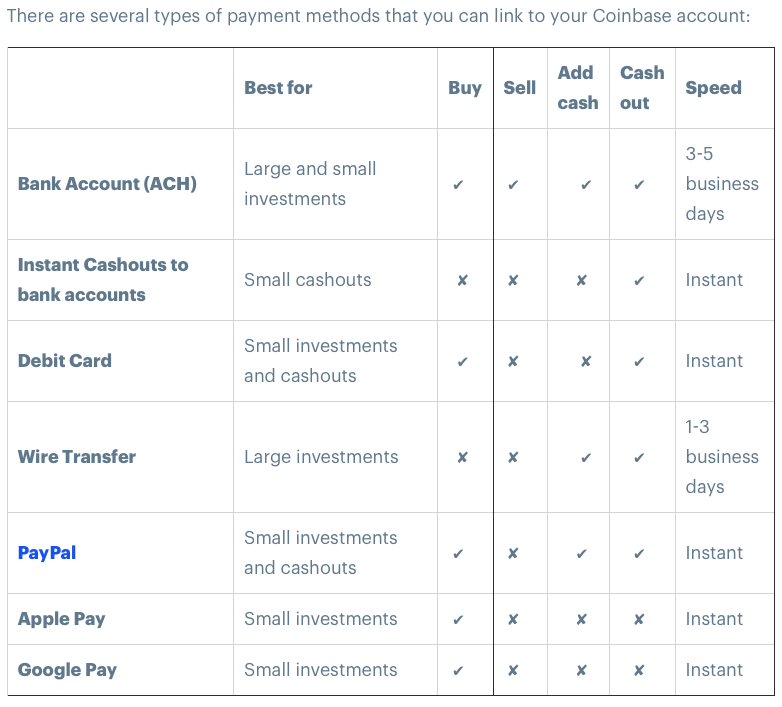
Coinbase funding methods chart Buy Ethereum. Coinbase will deduct the amount you type in from your funding source and convert it into ETH.

Sidebar: What’s An NFT Gonna Cost?
How much ETH do you need to buy an NFT? Check out the prices of various collections on OpenSea. That link shows you the trading volume for each collection over the past 24 hours and the “floor” price of each collection - i.e., what the lowest listed price for an NFT in that collection is. But keep in mind transactions on the Ethereum blockchain are not free; anything you do will cost “gas”, which varies depending on how many transactions are queued to be verified at a given time. When evaluating NFT purchases, I’ve seen gas cost anywhere from about $20 to more than $3000 (in times of extreme congestion).
The gas you pay is an incentive for Ethereum miners to use some of their computational resources on your transaction. Another factor that influences the price of gas is the smart contract for the NFT you are buying; some contracts are optimized to lower gas fees and some aren’t.
Don’t worry - before you approve a transaction, you’ll see what the gas is likely to cost, so you can factor that into the total price. You can also use free tools like Blocknative’s gas estimator to see the current price of gas:
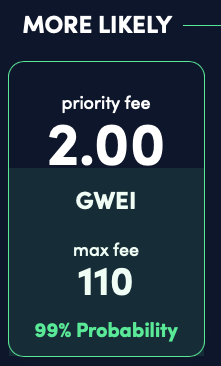
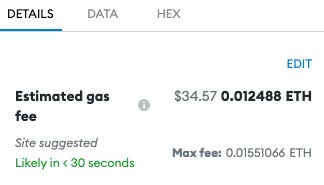
I took the above two screenshots at the same time to show you the correlation between the “max fee” shown on the gas estimator and the price of gas in dollars that my Metamask wallet is estimating I will pay for a potential transaction. Keep in mind that the transaction uses a variable number of gas units - you can check this amount in Metamask as well.
What is this “Metamask wallet” you speak of? Stay tuned - we’ll discuss that in Step 2.
If you find the above gas discussion to be confusing - I do, too. So I usually just get a sense of what it’ll cost by setting up the transaction in Metamask and looking at the estimated gas fee in dollars. I can always reject the transaction and lose nothing at that point if gas looks too pricey. But I initially check whether gas is low, medium, or high by looking at the gas estimator GWEI and comparing that mentally to what I’ve seen over the past several months. 110 is pretty low - I’ve seen as high as 500-600.
Step 2: Set up a wallet
There are several crypto “wallet” apps, but Metamask is the most popular one. By “wallet” we basically mean a secure place to store your digital assets, like the ETH we bought earlier on Coinbase, and the NFT we’re about to buy.
Sidebar: a more technical definition of “wallet”
Another way to think of an Ethereum wallet is that it’s:
a unique, 42-character hexadecimal address with 0x in the front, like this one: 0x71C7656EC7ab88b098defB751B7401B5f6d8976F. This is the public part of the address. Note: you will be using this 42-character address when you transfer assets.
a private key, which is a very large random number.
If I give you the public part of my Ethereum address, you can send me ETH or an NFT. But if you had my private key, you could access any assets at my address and steal them. Since very large random numbers are hard to remember, a seed phrase - or series of 12 words in a particular order - is used to act as the private key. Since there are 2^132 possible 12 word seed phrases, it’s effectively impossible to crack a private key.
Important: when you create your Metamask wallet, you will get a 12-word seed phrase. This is the private key to your wallet. Write it down and keep it somewhere safe. Never take a picture of it; never type it into any electronic device… unless you’re restoring your wallet. I recommend memorizing your seed phrase with a mnemonic device AND using a product like Cryptosteel to store it.
The cool thing about the seed phrase is that even if your house burned down and you lost everything on your computer, you could restore your wallet with the seed phrase. Essentially, it is your wallet!
If you give anyone else your seed phrase for ANY reason, you’re basically saying, “I’m an idiot; please steal all my assets.” If you lose access to your wallet and have lost your seed phrase, there’s no customer support line to call. Your assets are gone.
I use Metamask as a Chrome extension - simply download it and add it to Chrome. Note: make sure you’re downloading it directly from Metamask.io - there are some fake sites and fake apps out there.
You create a normal password to actually sign in to your Metamask account. As Gandalf might say, “Keep it secret! Keep it safe!” - if someone had access to your computer and knew your Metamask password, they could access your wallet and steal your funds.
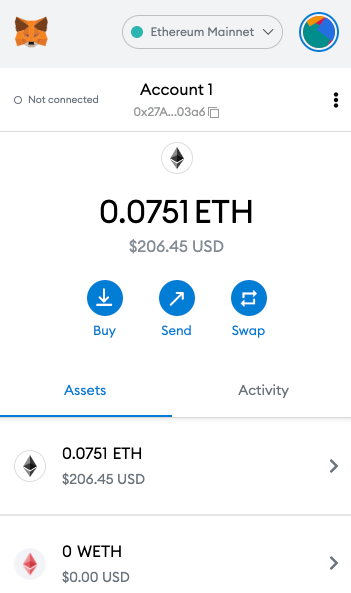
The above shows one of my Metamask wallets and its balance in ETH. You can also see the first and last parts of my public key to the wallet. That comes in handy for the next step, when we’ll tell Coinbase where to send the ETH we bought.
Step 3: Transfer ETH to your new wallet
Now, you can add funds to your Metamask wallet with a debit or credit card, but those methods have associated fees that range from $30 and up - plus, they have transaction limits. It’s easier and cheaper to transfer ETH from your Ethereum address on Coinbase to your Metamask Ethereum address.
Copy your Metamask Ethereum address by hovering over the visible parts of your public key and clicking on it.
In your Coinbase account, click “Send/Receive”, and make sure “Send” is selected and the “Pay with” says Ethereum. Type in the amount you want to send or click “send max”. Coinbase automatically tells you the maximum amount you can send, which includes the gas fee.
In the “To” field, paste your Metamask wallet’s Ethereum address and click continue, then approve the transaction.
P.S. It’s a good practice to visually verify the address you’re sending to is the one you intended; since Metamask obscures most of the address, you can paste it into any doc and then verify the address you’re sending ETH to from Coinbase matches. This visual verification is a basic safety measure - if you mistype an address when transferring, or mistakenly transfer ETH to a Bitcoin address, you just lost those assets. Again, there’s absolutely no recourse to get those assets back.
Some sites like Coinbase will throw up an error message for that latter example, but you’d be crazy to rely on that - double check everything, and when you’re new at this, it can be reassuring to do a small test transaction first.
Once the transaction processes (usually after 15-30 seconds), you’ll see the ETH you sent appear in your Metamask wallet, minus the gas fee.
Step 4: Connect the wallet to OpenSea
OpenSea is the most popular NFT marketplace. You can browse collections without connecting, but if you want to buy or sell an NFT, you’ll need to connect your wallet. This is easy:
Click on the profile icon on the top right of the Opensea website.
Select your type of wallet.
If you have more than one wallet in Metamask, select the one you want to connect, and click Continue.
Click Connect - this connects your Metamask wallet to Opensea.
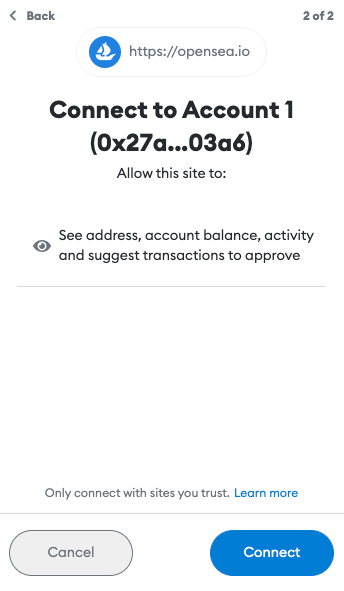
Note: make sure that you’re connecting to Opensea.io. Bookmark it. There are fake sites out there, some of which occasionally advertise on Google. Fake sites sometimes even outrank real sites on Google in the crypto world!
Step 5: Purchase an NFT
This is pretty simple, too. If there’s an NFT you want to buy that is for sale (you can click “buy now” on the left side of a collection’s screen to filter that collection by items people have listed at a fixed price), click on the item you want, and click “buy now”. You can also make an offer, but that requires an additional step - “wrapping” your ETH into WETH - which I won’t cover rn.
After clicking “buy now”, click the “confirm transaction” button that comes up. However, you didn’t actually confirm anything yet - now, your Metamask pop up will show the transaction along with the estimated gas fee and total price.
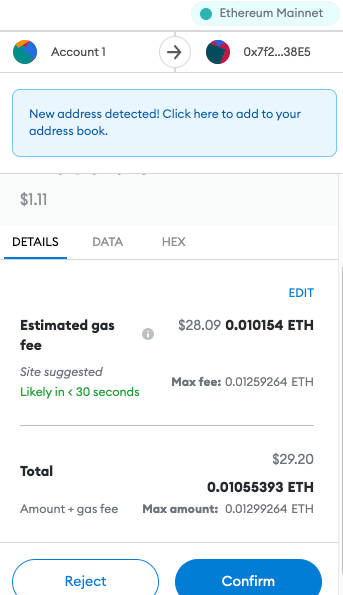
At the top there, you can see that you (Account 1) is sending ETH to the public address of the owner of the NFT. NOW, if you click confirm, the transaction will process. You can also click “reject” and cancel the transaction with no penalty. If you wait a bit, then click on your Opensea profile icon, you’ll see your new NFT!
BTW, when you’re done using OpenSea - or done using ANY site you’ve connected your Metamask to - it’s a smart idea to disconnect. Click the three dots icon at the top right of your MM screen > Connected Sites. This’ll show you which sites your MM is connected to - disconnect from them on that screen.
Pro tip: You can use sites like revoke.cash to revoke all permissions you’ve given to a site. Even though you’ve disconnected from a site, you may have still granted it permissions. Revoke.cash can come in handy if you’ve at any point connected to a potentially shady site, or to a legit site that gets hacked. The revoking will cost some minor gas fees.
Step 6: Sell the NFT
Unless you bought a “forever JPEG”, you may one day want to sell it. If you’re using Opensea, selling an NFT is pretty easy as well, but you’re going to incur some fees:
a one-time fee for the pleasure of listing something on Opensea (technically, to “initialize” your wallet). This might be $100-200 (ballpark guess).
a one-time fee to approve your wallet to sell an NFT from a certain collection. You’ll pay this fee every time you list an item from a new collection, i.e., a collection from which you’ve never listed an item. This might be $30+ (ballpark guess).
the percentages discussed above (these might be 10% of the transaction, or more).
Obviously, this all sucks. But if your NFT 10xs, you will probably pay those fees with a smile.
Once your NFT is listed, if someone buys it, boom! Your account now has more ETH in it, and the NFT is gone. If you want to cancel a listing, guess what - you gotta pay another fee ($30+ or so). Since NFTs are incredibly illiquid assets, you might want to make hay while the sun shines. If you stand to realize a substantial profit, it might make sense to sell, because if that collection gets forgotten about, you’ll have a cool-looking JPEG that no one will buy.
The Bottom Line
While not intended to be comprehensive, I hope this guide demystified some of the complications involved in funding a wallet and buying an NFT. By no means have I explained all the permutations and pitfalls involved, of course. For more NFT-related musings, follow me on Twitter.
Great article - thanks for breaking it down! Super helpful!